How to Edit Ecommerce Images with the Photoshop Pen Tool
Discover how to edit your e-commerce photographs and eliminate the backdrop with Photoshop’s Pen Tool. This comprehensive guide will demonstrate how.
Sep 01, 24 14 min read
Photoshop’s Pen Tool can quickly become your go-to tool for any situation where you need to separate an area of a picture from its surrounding elements.
The Pen Tool in Photoshop is a great tool for removing a product from its background or altering the color of a selected area of a product photograph. Additionally, you are free to alter, save, and use the trails made with the Pen Tool as frequently as you like.
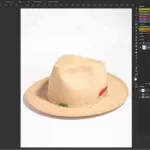
In this article, we will be utilizing the Pen Tool to make this sock image look better by removing the backdrop and adding a fresh shadow.
Why is the Pen Tool in Photoshop the most effective tool for precisely making selections?
With its new generative AI tools, Magic Wand tools, and lasso tools, Photoshop 2024 has an abundance of possibilities for producing selections. Pen tool routes still yield the most accurate selections, though.
Having edited photos digitally for more than 25 years, I have witnessed hundreds of technological advancements in Photoshop and other photo-editing programs. Furthermore, I am confident in saying that nothing has ever compared to or will ever compare to a road created by humans. The accuracy of human expertise cannot be duplicated by a computer program, particularly when it comes to making choices.
What does Photoshop’s Pen Tool do?
Photoshop’s Pen Tool generates shapes and pathways that may be copied and edited to produce intricate selections, masks, and objects. When you use the Pen Tool, it always creates a vector path, as opposed to the Brush and Pencil Tools, which “draw” pixels onto your image.
It is possible to generate more than one path inside an image, as well as more than one path segment inside a path. In the Paths Panel, these paths show up as Work Paths or Shape Paths.
You can draw unique shapes on your image using Shape Paths made with the Pen Tool, and you can use these to highlight particular areas of your image. those made using the Pen Tool can be adjusted in any way, unlike those made with the regular Shape Tools (like the Ellipse or Rectangle Tools).
Photoshop uses work paths, on the other hand, to save path data without coloring the path itself. These Work Paths can be selected, altered, and reused as many as necessary after they are stored inside the Paths panel.
In Photoshop, where is the Paths Panel located?
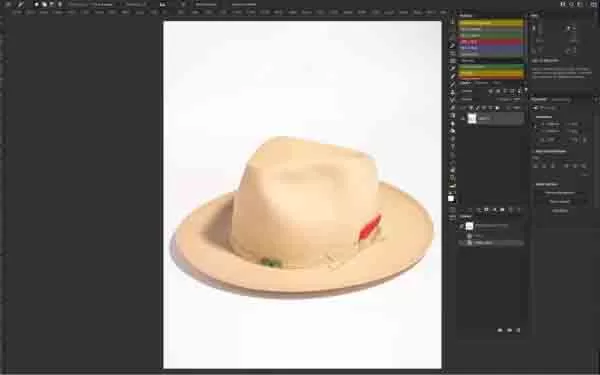
Since the Paths Panel and the Pen Tool work together, you must have the Paths Panel visible before using the Pen Tool.
Paths can be accessed in the Essentials (default) workspace by selecting the Paths tab that is displayed in the Layers Panel. You can access Paths by clicking on the Windows dropdown menu and choosing Paths if there is not a Paths Panel visible in your workspace.
Types of Pen Tools in Photoshop
In Photoshop CC 2024, there are four different Pen Tools you can use to create a new path:
The standard Pen Tool
The Curvature Pen Tool
The Freeform Pen Tool
The Magnetic Pen Tool (only visible by adjusting the settings of the Freeform Pen Tool)
The other Pen Tool options are used to modify an existing path. Those tools are:
The Add Anchor Point Tool
The Delete Anchor Point Tool
The Convert Point Tool
The Standard Pen Tool
We’ll use the standard Pen Tool for the paths we’ll be creating in this exercise. It’s the original Pen Tool and is very similar to the Pen Tool in Adobe Illustrator. You can create just about any kind of path with this tool.
The Freeform Pen Tool
The Freeform Pen Tool allows you to draw with the Pen Tool in the same way you would draw with the brush tool, creating a path as you draw.
The Magnetic Pen Tool
With the Freeform Pen Tool selected, you can check the Magnetic option at the top of the application window and access the Magnetic Pen Tool.
The Magnetic Pen Tool works much like the Magnetic Lasso Tool, allowing you to trace the exterior of a shape within your image. It’s not perfect, however, so we suggest you work with the Standard Pen Tool whenever possible.
The Curvature Pen Tool
The Curvature Pen Tool automatically lays down curves between points as you draw your path. This is a great tool to use if the path or shape you want to create has curved edges. You can always adjust the curves after the path is created by using the selection tools and modifying tools discussed below.
The Add Anchor Point Tool
The Add Anchor Point Tool gives you the ability to add more points onto your path once it’s been created. Hover the Add Anchor Point Tool over the part of the path where you want to add a new point and click the mouse to create the point.
The Delete Anchor Point Tool
The Delete Anchor Point Tool removes points from your path after the path has been completed. Hover your cursor over the point you want removed and click the mouse to delete the point from the path.
The Convert Point Tool
The Convert Point Tool is extremely useful. If you have a point forming a sharp corner on your path and you want to convert that corner to a curve, clicking the Convert Point Tool will make that happen. Conversely, the Convert Point Tool will remove a curve from a point and convert the point to a corner.
Paths vs. Shapes in Photoshop
When you access either the standard Pen Tool, the Curvature Pen Tool or the Freeform Pen Tool, you can set your Pen Tool setting to either Path or Shape in the options bar at the top of the application window.
Drawing with the Pen Tool when Path is selected creates a new Work Path that appears in the Paths Panel. Drawing with the Pen Tool when Shape is selected creates a new Shape Path that appears in both the Paths Panel and the Layers Panel.
When you choose Shape, you can also change a few different settings, including stroke color, thickness and fill color of the shape. We’ll go over the specifics of creating a shape with the Pen Tool at the end of this article.
When you choose Path, you’ll see an icon that looks like two small overlapping squares (this icon is also available when Shape is chosen once you’ve already begun drawing your path). If you’re creating an initial path to become a selection, set this option to Combine Shapes.
You’ll see a few other icons in the options bar, but for the purposes of this tutorial, you should leave those at their default values.
How to use the Pen Tool in Photoshop
How to use the Pen Tool in Photoshop to create a path
The standard Pen Tool allows you to create straight and curved paths with amazing accuracy, but mastering it takes some practice. Don’t get discouraged if it’s difficult at first. You can always adjust a path after you create it.
To create a path that you can then use as a selection, choose the standard Pen Tool, and then choose Path in the options bar dropdown menu at the top of the application window.
How to use the Pen Tool in Photoshop to create a new path
To start your path, click on your image with your mouse where you want to begin your path. To keep things simple, choose a starting point that is at the edge of a straight line, such as the edge of the top of the sock in the image below.
Click again along the edge of your object with the Pen Tool to draw the first segment of your path. You should now see a straight line appear.
Also, note a Work Path appears in the Paths panel as soon as you place the second point.
Create a curved path segment with the Pen Tool
To create a curve with the standard Pen Tool (such as the curves at the ankle of the sock), click to create the next point and drag with the Pen Tool before you release the mouse button. You’ll see lines, called handles, appear.
These handles are tangential to the curve being formed by the path. Moving the mouse around will adjust the handles, which will then adjust the line’s curvature. Once you’re satisfied with the shape of the curve, release the mouse button.
Note the handles formed from the curved line appear before and after the point. Therefore, the next portion of the path that you draw after creating a curved line will follow the trajectory of the handle from the last point.
When you click the next point, drag the mouse to create new handles and modify the curve that appears with your new point.
Creating a straight path segment after a curved path segment with the Pen Tool
If you want to prevent the next segment of your path from curving along the handle of your last point, you can “corner” the point by clicking on the point with the mouse while typing ALT (OPTION on Mac). The second handle will disappear.
The next point you set will be unaffected by the previous curve.
Closing your path with the Pen Tool
Once your path is complete, close your path by hovering the Pen Tool over the very first point you set down. When you see a small circle appear to the right of the Pen Tool, click on the point.
Your path will now be closed.
How to adjust the path you created using the Pen Tool in Photoshop
How to save your path
Saving your path is extremely important at this stage. Without saving, you could accidentally overwrite your hard work when you create another path.
To save your path, go to your Paths Panel and look for a new Work Path. Double click on Work Path to name your path and save it.
How to modify an existing path with the Pen Tool
Once you’ve created your path, you can modify any areas that need tweaking. It’s helpful to zoom in on different areas of your path to ensure the path follows the object exactly.
If you don’t see your path in your image, click on the path’s name in the Paths Panel.
The path will appear in your image, and you’ll be able to adjust it as needed using any of the methods below.
How to add additional paths to an existing path using the Pen Tool
In our yellow sock example, there’s a path around the outside of the sock. But what if we wanted to cut out a shape inside of the sock for demonstrative or artistic purposes? We can do so by adding an additional path to our existing path. This method also works well for removing interior shapes from certain product images, such as the inside of a mug handle or the loop in an earring.
With the path selected in the Paths panel, select the Pen Tool from the Toolbar. In the options bar at the top of the screen, click on the icon that looks like two little overlapping squares, and choose Exclude Overlapping Shapes.
While the current path is still visible, begin to draw the area that you want to exclude from your selection with the Pen Tool. Close the path when you’re done.
When we make a selection from our path later, the area created with this new path will be cut out from the rest of the selection.
How to modify existing points and curves along a path
To modify an existing point or handle on a path, find the Path Selection tools in the Toolbar. These tools each look like an arrow, and by default are located beneath the Type Tool in the Toolbar.
When you click on the visible Path Selection Tool, you’ll see options. Choose the Direct Selection Tool, which looks like a white arrow.
Clicking directly on a path segment with the Direct Selection Tool will reveal all points as white boxes, along with the handles of the selected segment. You can use the Direct Selection Tool to drag visible handles to adjust segment curves or move existing points.
How to add new points to a path
The Add Anchor Point Tool, accessible by clicking and holding on the Pen Tool in the Toolbar, will add extra points along the path.
With the Add Anchor Point Tool selected, hover over the path and click to create a new point.
Once you’ve set down the new point, you can use the Direct Selection Tool to modify the point’s location or its handles.
How to remove points from a path
The Delete Anchor Point Tool, also accessible by clicking and holding on the Pen Tool in the Toolbar, removes existing points from the path.
With the Delete Anchor Point Tool selected, hover over an existing point until the tool becomes visible and click. The point will disappear, and the surrounding path segments will conjoin into one segment. Be aware this can create some unexpected results if the handles on the surrounding points are particularly long.
How to use the Convert Point tool
The Convert Point Tool, accessed by clicking and holding on the Pen Tool, allows you to manipulate handles of existing points the same way you would manipulate handles using the Direct Selection Tool.
Unlike the Direct Selection Tool, however, the Convert Point Tool does not allow you to move existing anchor points, because when you click on a point with the Convert Point Tool, the path segments adjacent to the point convert from straight lines to curved lines, and vice versa.
If you click on a point that has handles with the Convert Point Tool, the handles will disappear and the anchor point will become a corner. If the surrounding anchor points have handles, those handles will still continue to affect the curve of adjacent path segments.
How to use a path to remove an object from its background
Now that your path is created, you can use it over and over again to create selections and use that selection to remove an object from its background.
How to create a selection from a path
In your Paths panel, select your path. Then, click on the icon at the bottom of the panel that looks like a circle with a dashed outline. A selection in the shape of your path will appear in your image.
You can also create a selection with the Pen Tool. With the path selected, and with the Pen Tool selected, click on the Selection button next to Make: in the options bar.
A dialog box allowing you to make adjustments to the selection will appear. If you’re creating the selection in order to isolate an object from its background, you should keep the Feather Radius at 0 and keep Anti-Aliased checked. If this is the first selection you’re creating, the radio button next to New Selection will be selected.
Once you’ve created your selection, you can use the selection to modify the color of the object or to remove the object from its background.
How to cut out an object from the background
Once you’ve created your selection from your path, you can remove the portion of the image from its background by either copying it into another layer, or by creating a layer mask. In order to do any of the following methods, you must be in the layer which contains the image you wish to isolate.
Removing a background by copying a selection
You can copy your selection by typing CTRL + C (COMMAND + C on a Mac) and then pasting the selection by typing CTRL + V (COMMAND + V on a Mac). Your selection will automatically appear in a new layer. You can make your original layer invisible in the layers panel to see the isolated object.
Note that the small section in the toe of the sock also was removed. This would be a useful effect if we wanted to show how the toes look within the sock. However, if we want to remove that cut-out, simply go back into your original path and your original layer, click on the interior path within the sock with the Direct Selection Tool, and type BACKSPACE (DELETE on a Mac).
Removing a background by creating a layer mask
To create a layer mask, create a selection from your path using the method described above. Then, locate the Layer Mask icon. This icon is available in both the Paths panel and the Layers panel at the bottom of the panel and looks like a white rectangle with a circle inside.
Click on the icon to automatically create a Layer Mask.
How to create a shape using the Pen Tool
You can designate a path to be a Shape Path before you create the path by selecting Shape from the menu in the options bar for the Pen Tool.
We mentioned this earlier: Next to the Shape option, you can change the shape’s color by double-clicking on the color rectangle next to Fill. A color menu will appear—the top bar of the color menu allows you to change the color by choosing no fill (transparent), a solid color, a gradient color, a pattern or a custom color. The bottom portion of the menu shows available swatches.
You can also change the shape’s outline color by double clicking on the color rectangle next to Stroke. And to adjust the width of the stroke, change the width in the dropdown menu just to the right of the Stroke’s color.
Once you have your Shape Path’s settings correct, you can draw a shape with the Pen Tool the same way you would draw a regular path.
When you create a shape using the Pen Tool, you automatically create a new Layer containing that shape, as well as a Shape Path in your Paths panel.
How to transform or scale a Shape Path
With the Shape Path selected in your Paths panel, click on the Edit dropdown menu at the top of the screen and choose Transform Path to access any of the transform functions. You can also choose Free Transform Path from the Edit dropdown menu, or type CTRL + T (COMMAND + T on a Mac) to scale or rotate your path.
That’s a lot of information to remember. Feeling overwhelmed? You can always outsource your background removal and other image-editing needs. Our prices start at just 39¢/image.